Building my portfolio site, I thought I’d show you how I set up my WordPress development using Docker. Given the way my current site architecture is set up, it is the process flow that I am currently using now but it will most certainly change in future as I continue to learn more about Docker containerisation and Kubernetes and transition the server away from traditional hosting environment more to one that is containerised and can be replicated with instances.
Current Architecture
So my current portfolio site, runs on a typical LAMP stack:
- Ubuntu
- Apache
- MySQL 5.7
- PHP 7.2
It is currently hosted on Amazon Lightsail VPS pointing to the ap-southeast-2 region. I am also using Git for version control. Setting up the LAMP environment for me is currently a manual task, I am hoping to rid this as I continue to improve my procedures.
The annoy thing thing I find when I need to work on templating and content changes for WordPress is the need to sync my live site with my local development site. The reason a sync needs to be made is because:
- WordPress updates and plugins may occur on the production site and won’t necessarily be committed in version control. This also includes database schema updates.
- Users may leave comments on your site – these are stored in the database and you don’t want to lose these, and
- Making template changes on the production site sucks and is bad for version controlling your source code.
Process Flow Summary for Wordpress Development Using Docker
FYI, I am working on a Mac OS machine. In essence, here’s how I currently have my process flow set up to do WordPress development using Docker:
- Sync changes from production to local machine using remote SSH commands
- Perform a Docker build to set up a container for my database and WordPress site files
- Start the Docker containers to get a working local working environment
- Perform template changes, WordPress and plugin updates locally
- Commit changes to Git
- Put production site into maintenance mode
- Git Pull latest changes on production site
- Run a command locally to export the local database then import it to the remote database via SSH.
Yes there’s a few steps here that could be improved but I will improve this during my spare time.
The Detailed Process
Syncing Changes from Production to the Local Environment
To quickly connect to my production server, I add an entry to my ~/.ssh/config file:
# Contents of ~/.ssh/config
Host pt
    HostName
    User
    IdentityFile /path/to/special/privatekey/amazon.pem
So now when I need to sync changes from production, I simply run these commands in terminal:
# Dump SQL to local from remote
ssh pt mysqldump -p -u mysqluser mysqldb > c.sql

# Sync remote to local folder
rsync -auH pt:/var/www/html .
I now have my latest database changes locally (in a dump file) and any new code changes will be tracked in Git locally.
Docker Build your Image
Using docker build, users can create an automated build that executes several command-line instructions in succession. Here are my relevant docker files:
DockerFile
FROM wordpress:php7.2-apache
RUN apt-get update && \
apt-get install -y --no-install-recommends ssl-cert && \
rm -r /var/lib/apt/lists/* && \
a2enmod ssl && \
a2ensite default-ssl

EXPOSE 80
EXPOSE 443
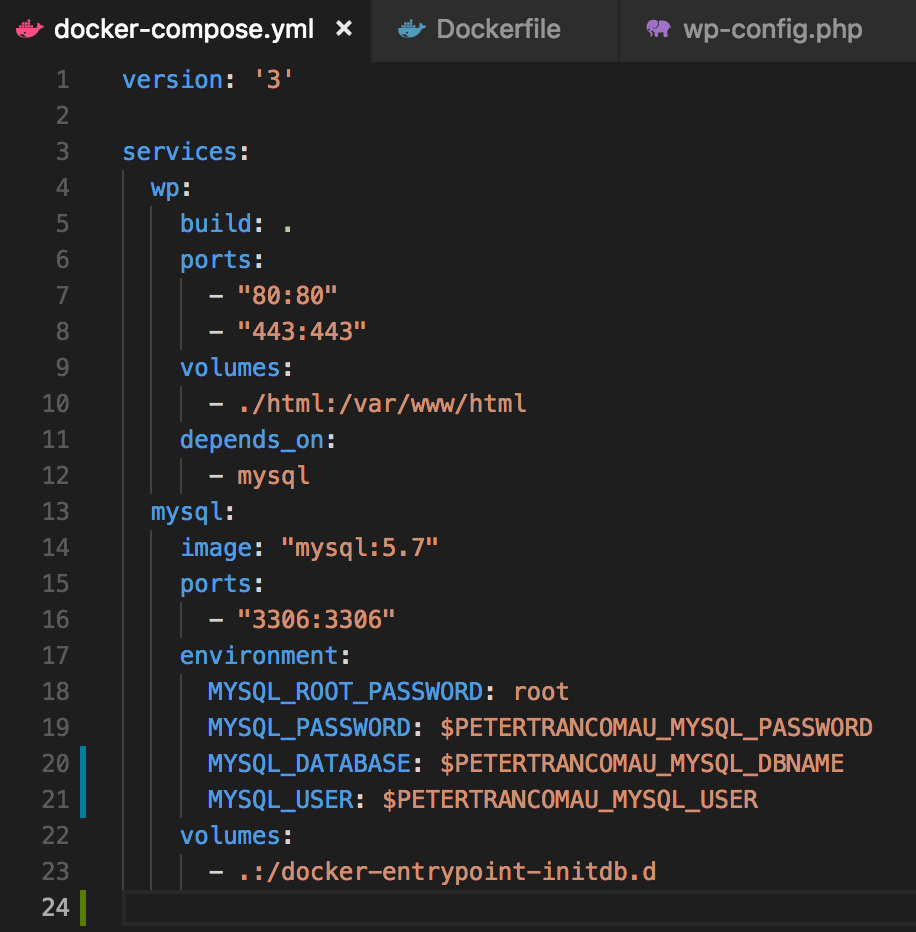
docker-compose.yml
version: '3'

services:
  wp:
    build: .
    ports:
      - "80:80"
      - "443:443"
    volumes:
      - ./html:/var/www/html
    depends_on:
      - mysql
  mysql:
    image: "mysql:5.7"
    ports:
      - "3306:3306"
    environment:
      MYSQL_ROOT_PASSWORD: root
      MYSQL_PASSWORD: $MYSQL_PASSWORD
      MYSQL_DATABASE: mysqluser
      MYSQL_USER: mysqluser
    volumes:
      - .:/docker-entrypoint-initdb.d
They key points to note in these files are:
- The Dockerfile has steps to install packages to enable SSL/HTTPS
- On my local machine, I put my MySQL password into an environment variable using export MYSQL_PASSWORD=xxxx
- The volume I mount in the docker-compose.yml file will tell the MySQL Docker image to look for any *.sql, *.gz or *.sql.gz files in the root folder of my project and initialise it by creating a database with the same username and password by default
Configure WordPress wp-config.php File
Configure your local wp-config.php file so it has these settings:
define('DB_NAME', getenv('MYSQL_DATABASE');
define('DB_USER', getenv('MYSQL_USER');
define('DB_PASSWORD', getenv('MYSQL_PASSWORD');
define('DB_HOST', 'mysql://localhost');
Start the Docker Container
Everything should now be setup for you now to run:
docker-compose up -d
Your WordPress site should load successfully when you access https://localhost in your browser.
Change your Hostname
If your WordPress site has full URL links to assets such as images (e.g. https://petertran.com.au/wp-content/uploads/2018/07/16/image.jpg), they won’t load on your local development till you change your /etc/hosts file to have an entry that matches your live production domain name. To do this, run the following in terminal:
sudo echo "127.0.0.1 " >> /etc/hosts
Saving Local Changes
After you complete your code changes, commit your code locally using git.
Make a database dump now:
docker exec _wp-mysql_1 mysqldump source_dbname > ./local/path/to/dump.sql
Deploying Changes to Live Site
I use Git to pull in the latest code changes and run a few SSH commands to import a local MySQL dump file to the remote MySQL server. The process goes like this:
ssh pt 'git pull'
ssh pt 'mysql -u username -p dest_dbname -e "EMPTY DATABASE dest_dbname;"'
ssh pt 'mysql -u username -p dest_dbname' < ./local/path/to/dump.sql
Clearing Caches and Testing
Now that your new changes are live, you can log into the WordPress admin on your live site to clear any caches you may have, do a visual check and functional test of your new changes.
Summary and Future Improvements
A lot of these steps are quite manual and could be scripted further to make easy. Some changes to this workflow I would like to do are possibly:
- To transfer a lot of these manually run commands into an interactive bash script with a selection choice
- Utilise git hooks to automate some areas for automation
- Introducing a pipeline deploy, method where old instances of AWS Lightsail are destroyed and new ones with the new changes are instantiated (a server pre-setup script would need to be authored to do this)
Did you follow this guide by any chance? If you did, I’m curious to hear about how you went or what improvements you would make to this workflow. Let me know in the comments!